Tuesday, 28 December 2010

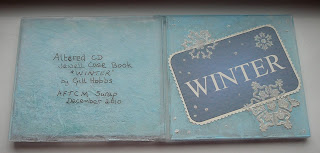
Altered CD Jewel Case - "WINTER"


OMGosh what have I signed up for!!!!!!

How do I alter a clear plastic surface of a CD case?

A slick shiny surface!

What will stick permanently?.............What do I have in my stash.............

Ahhhhhhhhh yes of course.............

I started by scratching the outside with a sanding block. Then mixed together pale blue acrylic paint with Jo Sonja texture paste, roughly brushed this mixture onto the outside of case, then left it to dry overnight.

With Word Art I created the “Winter” title, printed, and glued to front with texture paste.

The snowflakes are stenciled using texture paste, place the stencil flat against the surface, smear on the texture paste ensuring all areas are covered, scrape off excess paste with a flat knife or an old credit card, carefully lift the stencil, straight up, then I sprinkled on Glamour Dust to make an icy glisten! Leave to dry thoroughly. Wash the stencil straight away before the paste hardens.


My theme is the 3 months of “Winter” December, January & February.

Inside of CD case, I stenciled the snowflakes with the texture paste, straight onto the clear plastic of the case and sprinkled the glamour dust too, these snowflakes took a long time to dry, but well worth the wait, they are permanently fixed.The pages of the booklet was made with double thickness card, with white satin ribbon hinges. I used pale blue card, inked and stenciled snowflakes randomly with Tim Holtz Distress Inks – Broken China & Tumbled Glass + white pearl acrylic paint.


Pages 1 & 2

Chill December brings the sleet.
Blazing Fire, and Christmas treat.
Simply done with a window effect, looking into a cosy room, fire blazing and Christmas tree.


Pages 3 & 4
  
January brings the snow,
Makes our feet and fingers glow.
A paper napkin, decoupaged onto card with 3D clear Gloss Finish (Liquid Embossing)
And white snow using 3D fabric paint.


Page 5 & 6


February brings the rain,
Thaws the frozen lake again.
Googled and printed images of rain & thawing lake.
Embellished the rain page with a hand painted umbrella, silver corner peel offs,
silver adhesive dots and 3D clear gloss finish.


                                                                    2 ways to display
Am extremely happy with the end result ---- ideas now for "Spring" "Summer" & "Autumn"
Wednesday, 15 December 2010

Scraplings

  Scraplings are little narrow cards made from scrap cardstock. These mini cards were made with scrap card measuring 1 1/2" x 8 1/2", then folded in half. The theme "RED, WHITE & GREEN".
Had a little fun with these, used white card for them both, one was a daisy with Santa's face as the flowers centre, the other I used red and green ink, stenciled small circles, alternated the colours, allowing some to overlap, I love dots, once I start dipping a stylus into paint its hard to stop! Finally added flowers in red with a tiny white brad centre.

Saturday, 4 December 2010

Playing with an old paperback book!

Back to childhood lol "just playing" one of my favourite pastimes. TG posted a blog with lots of super cards, one of which had a little girls stamped image, where her dress was printed text, now this isn't anything like what I saw, but am reasonably happy on outcome & have lots of playing options still to do. Must have a really good look through my stamps and images.. as they say ..watch this space.

Sunday, 28 November 2010

Ten Two Studio - Countdown to Christmas free images

Hi everyone
Have posted a link for the "Ten Two Studios"
Every day between December 1st and December 25th 2010, they will reveal a new page of printable image sheets.
Please visit the site link just above my picture trail link at the top of this page,also on the site you can find out how you can use these images.

Happy Crafting

Saturday, 13 November 2010

Christmas cards x 3


My Christmas cards swap 2010.
I used aperture cards. Paper napkins were glued with Modge Podge onto “Aida” cross stitch fabric. Once dry I cut out part of the design, allowing it to come out over the aperture edges, I floated gold paint to highlight and embellished with a clear 3D writer. Finally added gold & green ribbon and attached a seasonal peel off. All 3 cards will be sent to USA.

Sunday, 24 October 2010

SHORN SHEEP NOTEBOOKS


Love creating these cute sheep, plan to sell them next year at a tourist attraction called "The Big Sheep" have been trying different ways to simplify the process, without losing the texture. Am now happy with results.

Sunday, 10 October 2010

Calender page No 4 - Happy at Last!!!! just 8 more left to do.........


The base of this calender page for August is a beautiful cornfield photo - found on the internet, have permission to use it too.....added a printed grid, poppy napkins, green fabric, bright green ribbon, hand painted corn stalks, also used, brown, buttermilk, black, copper & gold acrylic paint, clear 3D paint & distress inks
So looking forward to recieving 11 different pages from my swap group.