Tuesday, 28 December 2010

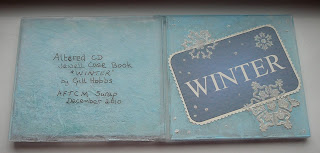
Altered CD Jewel Case - "WINTER"


OMGosh what have I signed up for!!!!!!

How do I alter a clear plastic surface of a CD case?

A slick shiny surface!

What will stick permanently?.............What do I have in my stash.............

Ahhhhhhhhh yes of course.............

I started by scratching the outside with a sanding block. Then mixed together pale blue acrylic paint with Jo Sonja texture paste, roughly brushed this mixture onto the outside of case, then left it to dry overnight.

With Word Art I created the “Winter” title, printed, and glued to front with texture paste.

The snowflakes are stenciled using texture paste, place the stencil flat against the surface, smear on the texture paste ensuring all areas are covered, scrape off excess paste with a flat knife or an old credit card, carefully lift the stencil, straight up, then I sprinkled on Glamour Dust to make an icy glisten! Leave to dry thoroughly. Wash the stencil straight away before the paste hardens.


My theme is the 3 months of “Winter” December, January & February.

Inside of CD case, I stenciled the snowflakes with the texture paste, straight onto the clear plastic of the case and sprinkled the glamour dust too, these snowflakes took a long time to dry, but well worth the wait, they are permanently fixed.The pages of the booklet was made with double thickness card, with white satin ribbon hinges. I used pale blue card, inked and stenciled snowflakes randomly with Tim Holtz Distress Inks – Broken China & Tumbled Glass + white pearl acrylic paint.


Pages 1 & 2

Chill December brings the sleet.
Blazing Fire, and Christmas treat.
Simply done with a window effect, looking into a cosy room, fire blazing and Christmas tree.


Pages 3 & 4
  
January brings the snow,
Makes our feet and fingers glow.
A paper napkin, decoupaged onto card with 3D clear Gloss Finish (Liquid Embossing)
And white snow using 3D fabric paint.


Page 5 & 6


February brings the rain,
Thaws the frozen lake again.
Googled and printed images of rain & thawing lake.
Embellished the rain page with a hand painted umbrella, silver corner peel offs,
silver adhesive dots and 3D clear gloss finish.


                                                                    2 ways to display
Am extremely happy with the end result ---- ideas now for "Spring" "Summer" & "Autumn"
Wednesday, 15 December 2010

Scraplings

  Scraplings are little narrow cards made from scrap cardstock. These mini cards were made with scrap card measuring 1 1/2" x 8 1/2", then folded in half. The theme "RED, WHITE & GREEN".
Had a little fun with these, used white card for them both, one was a daisy with Santa's face as the flowers centre, the other I used red and green ink, stenciled small circles, alternated the colours, allowing some to overlap, I love dots, once I start dipping a stylus into paint its hard to stop! Finally added flowers in red with a tiny white brad centre.

Saturday, 4 December 2010

Playing with an old paperback book!

Back to childhood lol "just playing" one of my favourite pastimes. TG posted a blog with lots of super cards, one of which had a little girls stamped image, where her dress was printed text, now this isn't anything like what I saw, but am reasonably happy on outcome & have lots of playing options still to do. Must have a really good look through my stamps and images.. as they say ..watch this space.

Sunday, 28 November 2010

Ten Two Studio - Countdown to Christmas free images

Hi everyone
Have posted a link for the "Ten Two Studios"
Every day between December 1st and December 25th 2010, they will reveal a new page of printable image sheets.
Please visit the site link just above my picture trail link at the top of this page,also on the site you can find out how you can use these images.

Happy Crafting

Saturday, 13 November 2010

Christmas cards x 3


My Christmas cards swap 2010.
I used aperture cards. Paper napkins were glued with Modge Podge onto “Aida” cross stitch fabric. Once dry I cut out part of the design, allowing it to come out over the aperture edges, I floated gold paint to highlight and embellished with a clear 3D writer. Finally added gold & green ribbon and attached a seasonal peel off. All 3 cards will be sent to USA.

Sunday, 24 October 2010

SHORN SHEEP NOTEBOOKS


Love creating these cute sheep, plan to sell them next year at a tourist attraction called "The Big Sheep" have been trying different ways to simplify the process, without losing the texture. Am now happy with results.

Sunday, 10 October 2010

Calender page No 4 - Happy at Last!!!! just 8 more left to do.........


The base of this calender page for August is a beautiful cornfield photo - found on the internet, have permission to use it too.....added a printed grid, poppy napkins, green fabric, bright green ribbon, hand painted corn stalks, also used, brown, buttermilk, black, copper & gold acrylic paint, clear 3D paint & distress inks
So looking forward to recieving 11 different pages from my swap group.

Saturday, 9 October 2010

Calender 2nd page


Nearly there - but not quite...........

Thursday, 7 October 2010

Calender 2nd page


Not sure if this is finished, may possibly come back to this one!!!!!!!!
Something not quite right, vegetating time required me thinks.......

August Calender first page


First page finished - one down 11 to go!!!!!!!!!!

Wednesday, 29 September 2010

August 2011


Still playing with first page - still 11 to go!

Monday, 27 September 2010

August Calender page for 2011


One down 11 to go !!!!!
There are days when I think I've taken on more than I can chew :-)

Saturday, 25 September 2010

BAA BAA BRA SHEEP


Our BADFA Convention is in 3 weeks time, we are exhibiting and auctioning decorated bras for "Breast Cancer" this is my attempt on a bra, have another new bra waiting to be done for a swap not sure yet what to do on that one - the sheep heads are part of my own design - "Shorn Sheep" This is off to Coventry later this morning, 1st class Royal Mail.

Friday, 24 September 2010

Domino Book! Re vamped


Travelled to Exeter for the Westpoint Craft Exhibition, had a ball looking and spending, I made the decision to only buy what I knew I'd use, its too easy to buy things you like and never ever use them! I wonder how many of us have done that.
I bought a butterfly punch - lots of fat quarters absolutely gorgeous fabric - a steam punk stamp set - Distress Inks - a book on how to make books and journals - musical peel offs - archival ink - self adhesive gems - and finally a big carton of card.
Today have re vamped my domino book - am now very pleased with it, used fabric & napkins to make embellishments, distress ink in Dusky Pink & Old Paper and gold paint.
Love the distress ink on the napkins - looks like stone - will use this again and again for backgrounds.
A productive learning day.

Monday, 20 September 2010

Finished - DOMINO BOOK


At last my Domino Book is finished – the dominoes I found are small, my artist flair isn’t very good with something this small….but all good for that important learning curve of what suits you best.
I have realized that I need to start thinking smaller, when collecting or making embellishments etc.
I started by covering the dominoes with white paper serviettes, giving a slightly rough texture, then painted them with gold acrylic paint – I found a bracelet which had metal elements, suitable for a fastening, it has 2 sets of holes, I threaded gold elastic through these holes, to fasten the book keeping it closed these loops can be pulled over the ends. A small pink butterfly is part of this fastener. I attached it to the front cover domino with Jo Sonja’s texture paste, it took a while to dry and it is rock hard and securely attached.
I cut the pages from a sturdy paper, cut them the width + double the height of the dominoes, folded each in half. Found some pink ribbon, which matched the butterfly, glued the ribbon inside each folded page leaving a little bit showing between each for a hinge this worked extremely well, without too much bulk, I left spare ribbon at each end to attach to domino covers. The pages lie nice and flat.
I covered these pages with gold luster fabric and scrapbook paper of small stenciled roses, I tried unsuccessfully to stamp on the fabric, it rubbed off, a mistake not to be repeated, but as a newbie that’s the best way for me to learn! So I used patches of white paper printed with the words “LIVE “LAUGH” & “LOVE”. Finally I attached the ribbon ends to the inside of both Domino covers, using a grey paper that I have embossed a gold butterfly onto, this butterfly is a tab that lifts up, underneath are the details of this swap.
My book is a very simple and easy design. I hope my swap partner likes it. I have enjoyed the challenge of making this wee book, am happy with the outcome. My best critics – my children – both say it is very nice – high praise indeed as they are rather too honest at times!

Sunday, 19 September 2010

Domino Books

At last have finished this mini book, I found it harder than I thought it would be!.
Have kept it simple, learnt a huge amount on what I can't do!!!! LOL I need to add permanent inks to my stash, have wasted several items, but I'm the gal to learn the hard way - will remember - waiting for camera battery to charge.......

Saturday, 4 September 2010

THINKING CAP.......................

......... is back on .......... next projects are a domimo book & a calender page ....
me thinks I best concentrate on my calender, will need 11 copies of my mastercopy!

Card of the Month - September 2010


Theme "BLACK, BROWN & CREAM"
The idea for this card is inspired by a Kaiser papercraft design.
Materials I used :-
A cream folded card + oddments of black and dark brown card, handmade paper in cream with brown fibers, coffee brown fabric with black writing, pearly cream beads & cream & black 3D writer pens.
I layered the middle section, started with the handmade paper, then black card and a strip of fabric, glued this to the base. The branches are narrow strips of brown, leaves are black, brown, faric and handmade paper, the bird shapes - main body is black, the wing/tail is brown, and the top of wing is handmade paper, all layered and glued on. Attached pearly cream beads on the branches with glue, I outlined the leaves and bird with black 3 D writing pen, used cream 3 D writing pen to outline the fabric strip and the birds eye. The frame was roughly cut from brown and glued on over the top, used the cream 3D writer pen around the inside edge. Finally added a few words on medium brown card "LAUGH as much as you breathe and LOVE as long as you LIVE, dotted the edges with black & cream 3D writer pens.

Back of Card


OH BUMMER!!!!!!!! when I turned my card over, I had a black smudge oh dear a "BOO BOO", mmmmmmmm thinking cap on.............stripes in Black & Brown, found the masking tape, tore off the currect length, stuck it onto my clothes to get rid of the stickiness, put on the card, did 2 stripes one black, the other brown, peeled back the masking tape - OH BUMMER!!!!!!!!!! BOO BOO No 2, it pulled off part of the card surface GRRRRRRRRRRRRRR (more unprintable words really!!!!) where is that darned thinking cap? mmmmmmmmmm Ok, I'll make more rough areas - a new technique for texture!!!!!!!!!!, sponged brown all over remaining cream card, hope my swap partner likes this "TEXTURE TECHNIQUE"
Happy now - and funnily me thinks I'll use this again, rough to smooth, it will come in handy for other things. :-)

Saturday, 28 August 2010

Buzzing Ideas.........

Ideas to think about for a Card of the Month - theme - Black, Brown & Cream.........
mmmmmmmmm watch this space, but till then, am working tonight, and tomorrow, so it'll have to wait untill Monday.
Happy Crafting one & all.

ATC's "I Hear A Symphony"


Here is my ideas of "I Hear A Symphony" using paper napkins. the background on both is napkins. 1st ATC - I stamped with music, added a little info about the London Philharmonic Orchestra and 3 Saxophones cut from fabric, added a few music notes in gold peel offs.
2nd ATC stamped music on a strip of white napkin, placed diagonally then a little info about Beethoven, printed a pic of Beethoven, layered it on white card, cut it out to look like a postage stamp placed a music motif in the corner, used the same gold peel off notes and clef to finish the design.

Friday, 27 August 2010

Tags - using Bleach Techniques


So enjoyed creating these tags. Tag 1 - made with card & fabric, the card was stamped using bleach instead of ink or paint with a large foam shell stamp, the fabric with footsteps in the sand was glued down with a gold ribbon to cover the join. The square embellishments and fish were stamped onto brown card, added bleach, which turned the card to a dusky pink colour. I love the beach, and I could not resist buying the fabric!

Tag 2 - The lady tag is stamped onto lilac card, then used the bleach to lighten bits here & there, my border stamp didn't quite meet up, so i used the Sharpie pen I use for zentangles and drew in the bits that were missing, then used the bleach again to lighten the outside edges, and then used acrylic gold paint to give a bit of bling. These have been recieved by Ruth W

Asian Book - made from Index Cards


Front cover - background, sponged with brown, black and gold. Stamped and embossed 3 Asian symbols, the gold corners and the vertical ASIAN letters, added a gold ribbon, then attached the 3 symbols on top.
Back cover - Printed a "tea" design on to white card, added my details to the centre panel, carefully cut out and glued to the back.
I punched holes in each page 1/2 inch from top and bottom, bought some gold elastic, tied securely to make a band, poked the elastic through the holes back to front and placed the ends of a wooden skewer through the loops, made a neat and simple binding. Sent this my first altered book to Tracey M from Liverpool here in the UK.

pages 1 & 2


page 1 - Inspired by the design on a paper napkin and my nieces holiday in Sri Lanka (Ceylon), she visited the Elephant Orphanage. I used golds and reds. Included 2 tags one of a banknote and the other a little info about the orphanage, with the Sri Lanka flag on the other side.

page 2 - background is gold and red fabric, made embossed tiles with gold card, the Chinese flag on red card, layered on embossed gold card with 2 small pockets for little tags, these tags made with black card with good luck symbols.

pages 3 & 4


pages 3 & 4 - background is opaque black paint - oriental design is by June Varey, painted using gold & copper metallic paints plus white.

pages 5 & 6


page 5 - background is textured wallpaper, randomly sponge painted with shades of pink. The cherry tree branch was painted brown with silver & gold highlights the flowers are stamped on the same wall paper, cut out and shaded in varying shades of pink, I added a little bling gold to the centres, and white 3D paint to the topmost flowers.

page6 - background is sponge painted using pinks and white, the fans are stamped onto card, coloured in with gold, white and pink. Added a pink ribbon, then stamped Chinese characters on base and ribbon, finished the design with 3 white fabric butterflies.

pages 7 & 8


page 7 - back ground is a mottled mixture of green, gold & black paint, with gold edging using a Woodcraft Marker Pen. The panda (inspired by an embroidery design) was painted onto thin canvas, edged again with the gold pen, stamped an asian symbol in the corner & added 3 small buttons to finish the page.
page 8 - back ground is black fabric with chinese writing, I painted the bamboo with green paint, edged the stems and leaves with gold glitter 3D paint, added a few sequins for a little extra bling.

Dots, Dots, Dots ATC's


Dots Dots Dots ATC's, using embossing somewhere in the design, now I didn't quite get my head around this theme, I think they are a bit niave - just sometimes the idea in the head dosen't come out quite as well as you think it ought to! Or maybe I tried too hard! Either way a good learning curve. These were sent to Elle (although the butterfly is slightly different cos I forgot to scan) felt a little guilty when I recieved and saw others designs.

Used gold embossing powder on both designs.
I used a cotton bud for the dotty flowers & leaves on the heart design.
The butterfly is blue sequins and dots of 3D paint with clear 3D wings

In No Particular Order!!!!!!

These projects have all been created since joining the "Art for the Creative Mind Yahoo Group".
Not in any particular order, but will try to be good!!!and do it properly after today.

My very first Art Doll, made with templates from The Enchanted Gallery.com
I chose black & white musical theme, used card, decopatch paper, and clear 3D paint on the boots, black piano keys and her hair.

Tuesday, 20 July 2010

ASIAN ATC's


Experimented with fabric -

(1) Covered card with black fabric with Asian words. Painted green Bamboo & leaves, outined them with gold 3D paint, added a few green sequin stars and a circle = Twinkling Bamboo.

(2) Covered with a lovely red & gold fabric, made an elephant with gold card, added bands of red and gold with "ASIAN" stamped using small individual letters = Gold Elephant.

Zentangles


Oh what fun, doodling patterns, oh my these are soooooooooo addictive. Used a Sharpie extra fine pen on a 4" x 4" card.

Natures Beauty Tags


My first tags, with the theme "Natures Beauty".
(1) Living near the sea, I have good memories of shell hunting with the children, they make good sandcastle windows and decoration, I handpainted the shell onto thin canvas, used a swirly stamp, gold glitter glue, gold and blue sequins and extra dimension with gold 3D paint
(2) The most beautiful bird in the world in my opion is the peacock.
Once again I used thin canvas, painted gold with a simple stamped border. The peacock is coloured in with nail varnish in various metallic colours. finally used 3D gold dots and 3 blue sequins.

ATC's HANDSOME MEN


Handsome Men + using the soot technique.

(1) a vintage image transfered onto thin canvas, layered onto blue card which is smoky with the soot technique, layered over silver card with a silver peel off corner, edged the image with a stamped border on a paler blue card.
(2) A cream coloured card, printed with "Handsome Men" in different languages. Tried the soot technique, but it didn't work too well, so LOL I cheated, used the soot on the bottom of the spoon, smeared it randomly between the words, added the arrow and black sequin circles and star, finally used a gold wax rub on to edges.
At last some spare time to update the projects have played and dabbled with, YIPEE catching up!!!!!

For The Birds Card of the Month


A simple design, used gold card, the cherry tree branch, is part of a paper serviette decoupaged onto card and carefully cut out. A small birdhouse made from card, hanging from branch with gold yarn. Finished with a sayings banner & 3D paint outlining flowers & birds flying overhead!

Saturday, 22 May 2010

Postcard - Alice In Wonderland


Paint the Roses Red.
Blue card for Alice's dress, gold edging for her gold/blonde hair.
Playing cards - Queen of Hearts - the Clubs who tried to paint the roses red.
Paper serviette roses, modge podged on to card, cut out then outlined with white 3D paint

Get Well Card


After scanning ATC's, I changed the size to 2" x 2" square - known as a twinchie. This square I then cut into 4 equal squares, used them on this layered card, the photo shows as black card, but it is gold shiny card. The experiment is basic, but am pleased with the overall effect.

Asian ATC 2 of 2


This second ATC, another simple design, is it blossom or a type of pine tree?
Simple gold basecoat, painted with dk brown, pinks & purples, embellished with clear, gold & white 3D paint.

Asain ATC's 1 of 2


Oh what to do, where to look, where to start..........
simple designs of asain blossoms, a design in a book, scanned and cropped to get the look I like. Gold paint for background, simply painted in pinks & dk burgundy, embellished with clear & gold 3D paint.

Tuesday, 18 May 2010

A clean blank canvas - ready to be filled ..............